Solid Surface Fabrication 101: Cutting, Seaming, and Finishing
Summary
Solid surface fabrication is a specialized trade — different from stone, different from wood, different from laminate. The material cuts with woodworking tools but requires adhesive chemistry and sanding technique that takes practice to master. This guide covers the three core skills: cutting, seaming, and finishing.
Cutting
Tools:
- Circular saw with carbide-tipped blade (80+ teeth, triple-chip grind) — for straight cuts
- Jigsaw with carbide blade — for curved cuts and cutouts
- Router with carbide bits — for edge profiling and flush-trimming
- Hole saw (carbide) — for faucet holes, drain holes
Technique:
- Cut with the finished face up (circular saw) or down (jigsaw)
- Support the sheet fully on both sides of the cut — unsupported cuts cause chipping
- Feed speed: moderate — too fast chips the edge, too slow burns the resin
- Dust control: solid surface dust is fine — use vacuum attachment and respirator
Seaming (Chemical Welding)
The seam is the most visible quality indicator in any solid surface installation.
Process:
- Joint edges must be perfectly straight — router or jointer for factory-fresh edges
- Clean both edges with denatured alcohol
- Apply seam adhesive (PMMA-based, color-matched to the sheet) to both edges
- Clamp with seam clamp tool — even pressure across the entire joint
- Allow 45–60 minutes cure time
- Scrape excess adhesive flush with a sharp carbide scraper
Sanding and Finishing
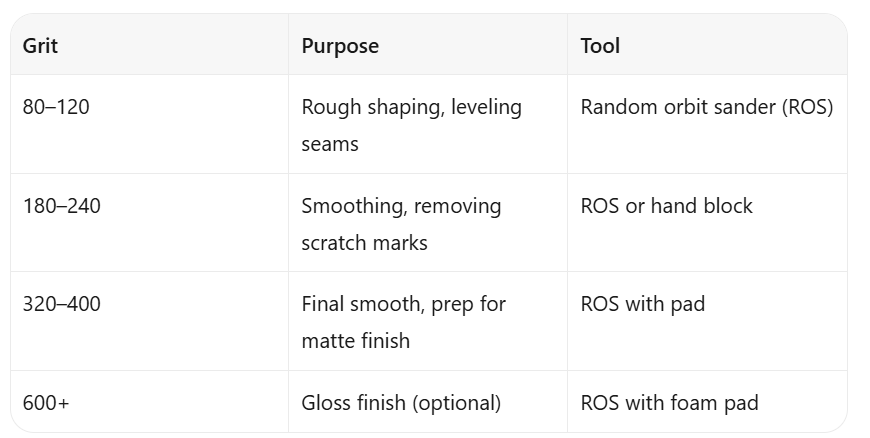
Matte finish: Stop at 320–400 grit, apply matte restorer compound Gloss finish: Continue to 800–1500 grit, apply gloss polish
Common Mistakes
-
Uneven clamping pressure — starved seam areas where adhesive was squeezed out
-
Premature sanding — seam needs full cure before sanding
-
Cross-grit contamination — don't jump from 80 to 400; follow the progression
-
Overheating during sanding — keep the sander moving; stationary sanding melts the resin
FAQ
Q: Can a general contractor learn solid surface fabrication? A: Basic skills (cutting, sanding) can be learned in a few days. Advanced skills (seam welding, thermoforming) require 6–12 months of practice. For commercial projects, always use a trained solid surface fabricator.
Q: What tools are essential? A: Carbide-tipped circular saw, router with bits, random orbit sander, seam clamps, and adhesive system. Total investment for a basic shop: $3,000–6,000.
Q: Is the dust hazardous? A: Solid surface dust contains ATH (alumina trihydrate) and acrylic resin. It's a respiratory irritant but not classified as silica or crystalline silica. Use dust extraction and N95 masks.
Related Articles

 EN
EN