Panely ze solid surface pro stěny sprchového koutu: Návod k instalaci pro komerční projekty
Shrnutí pro manažery (stručně)
Panely stěn sprchového koutu z pevného povrchu se instalují jinak než dlaždice nebo akrylové obklady sprchového koutu. Klíčové rozdíly: panely jsou chemicky svařeny po švu (nikoli omítány), rohy lze tepelným tvářením vytvarovat do spojitých zaoblení (bez silikonových švů) a celá instalace je rychlejší – 2–3 dny na jednu koupelnu oproti 4–6 dnům u dlaždic. Tento průvodce popisuje celý postup instalace pro komerční projekty, od přípravy podkladu až po finální dokončení.
Postup instalace (7 kroků)
Krok 1: Příprava podkladu
Podklad je základem. Panely stěn sprchového koutu z pevného povrchu jsou tuhé – neohýbají se, aby zakryly nerovné stěny. Podklad musí být rovný, kolmý a vodotěsný.
Doporučený podklad: cementová deska tloušťky ½" nebo ⅝" (Durock, HardieBacker nebo ekvivalent) upevněná na kovových nebo dřevěných roštích s rozestupem 16" (cca 40 cm).
Alternativy:
- Vodotěsná sádrokartonová deska (DensShield, Mold Tough) — povolena za předpokladu správného utěsnění
- Stávající obkladová dlažba — lze na ni montovat, pokud je dobře přilepená, avšak vyžaduje přípravu povrchu (vyčistit, natavit, základovat)
Hlavní požadavky:
- Všechny spáry podkladu je nutné zaklejit a utěsnit lepicí maltou nebo vodotěsnou membránou
- Povrch podkladu musí být rovný s tolerancí ⅛" na délce 48"
- Vodotěsná vrstva musí sahat alespoň 6" nad výšku sprchové hlavice
- Za cementovou desku na vnějších stěnách by měla být nainstalována parotěsná bariéra (polyetylen o tloušťce 6 mil)
Krok 2: Rozložení a řezání panelů
Před nanášením lepidla se panely rozloží pro suchou zkoušku.
Zohledněné aspekty rozložení:
- Upřednostňují se svislé spáry (jsou méně viditelné než vodorovné)
- Umístění švů by mělo vyhnout přímému proudu vody z sprchové hlavice
- Panely by měly být umístěny s mezerou 3 mm v rozích (pro tepelnou roztažnost a pro lepidlo na švy)
- Panely by měly končit 3 mm nad podlahou sprchy nebo sprchovým podstavcem
Části a součásti: Panely ze solid surface se řežou standardními nástroji s karbidovými břity:
- Kruhová pila s karbidovým kotoučem (jemné zuby, 80 a více zubů) pro rovné řezy
- Pilka na kov s karbidovým nožem pro vyříznutí otvorů (kohoutek sprchy, sprchová hlavice, nikše)
- Frézka s frézkou na vyrovnání hran pro přesné dokončení okrajů
Krok 3: Nanášení lepidla
Panely jsou lepeny na podklad dvousložkovým epoxidovým lepidlem nebo speciálním lepidlem pro panely ze solid surface.
Způsob aplikace:
- Lepidlo nanášejte na podklad ve svislých proužcích vzdálených od sebe 15 cm
- Také naneste nepřerušovaný pruh lepidla podél všech okrajů
- Umístěte panel na místo a lehce ho zatlučte gumovým kladivem, aby byl zajištěn úplný kontakt
- Použijte rozestupy nebo podložky pro panely, abyste udrželi mezery 3,2 mm u všech sousedních okrajů a rohů panelů
Krok 4: Svařování švů (kritický krok)
Právě tento krok rozhoduje o kvalitě instalace – svařování švů vytváří neviditelné spojení mezi sousedními panely.
Zpracování:
- Po dozrání lepidla (24 hodin) vyčistěte ševní drážku denaturálním lihem
- Naneste ševní lepidlo (na bázi PMMA) do drážky pomocí stříkačky nebo láhve s aplikátorem
- Šev upněte pomocí nástroje na upínání švů po dobu 45–60 minut
- Po dozrání lepidla odškrábete přebytek ostrým škrabákem tak, aby byl zarovnaný s povrchem
- Obrušte oblast švu postupně (zrnitost brusného papíru 120 → 240 → 400 → 600)
- Závěrečné broušení pro obnovení matného povrchu
Zkušený výrobce dokáže šev „zmizet“ – svařené spoje jsou stejně pevné jako základní materiál a vizuálně neviditelné z vzdálenosti 30 cm.
Krok 5: Úprava rohů
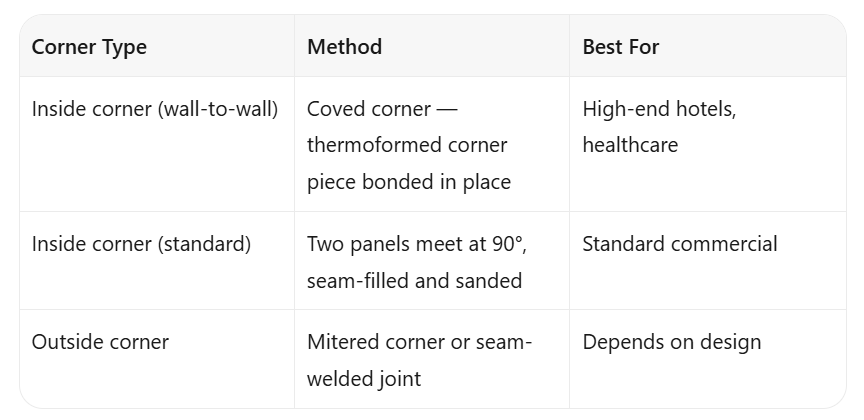
Zakulacené rohy jsou preferovaným standardem pro hotelové sprchy. Termoformovaný zakulacený díl vytváří spojitou křivku v místě spojení stěn – žádná silikonová spára, žádné usazování nečistot, snadná údržba.
Krok 6: Vyřezávání otvorů pro armatury
Otvory pro sprchový kohoutek, sprchovou hlavici a niky se vyřezávají až po instalaci panelů:
- Polohu armatur označte pomocí šablony nebo měřením
- Vyřežte kulaté otvory pomocí vrtáku na kruhové otvory (s karbidovými břity)
- Okraje vyřezaných otvorů upravte frézou pro čistý dokončený povrch
- Na okraji dekorativního krycího kroužku armatury naneste silikonové těsnění (toto je jedna z mála nevyhnutelných silikonových spár – avšak nachází se za dekorativním krycím kroužkem a není viditelná)
Pro zapuštěnou niši (poličku na mýdlo/šampon): niši lze vyříznout do desky a zezadu uzavřít pevnou povrchem nebo vodotěsným podkladem. Zaoblete rohy niše, pokud je to možné.
Krok 7: Dokončovací úprava
- Obrušte všechny švy a vyříznuté plochy na konečnou zrnitost (600).
- V případě potřeby naneste obnovující prostředek pro matný povrch.
- Celý povrch očistěte denaturovaným lihem.
- Na spoji mezi podlahou sprchy a deskou naneste silikonové těsnění (pásek o tloušťce 3 mm, vyhlazený).
- Nainstalujte krycí desky a dekorativní lišty.
Časový plán instalace (na jedno koupelno)
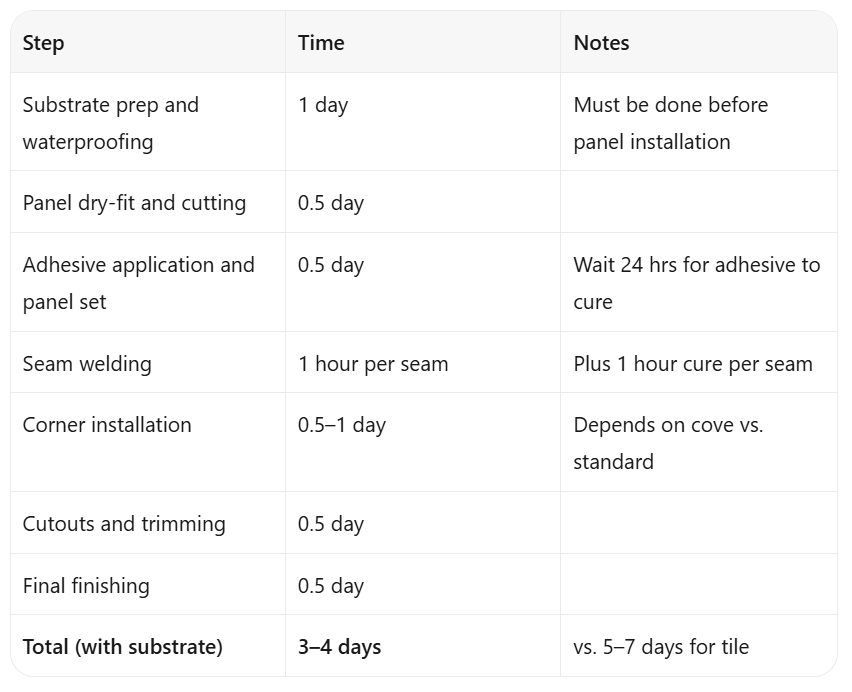
U rekonstrukčních projektů, při kterých jsou místnosti mimo provoz, se časová úspora oproti dlažbici může výrazně projevit. U 200 pokojového hotelu při úspoře 2 dní na pokoj se uvolní 400 stavebních dní.
Hlavní rozdíly oproti instalaci dlažby
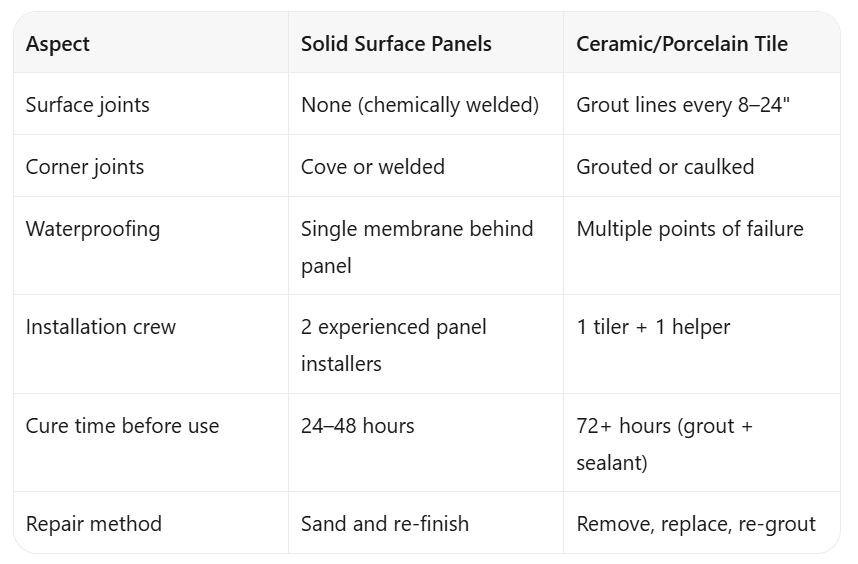
Běžné instalační chyby
-
Nerovný podklad. Pevný povrch se neprohýbá. Prohlubeň o ¼ palce ve zdi se projeví jako viditelná mezera. Před instalací panelů opravte zeď.
-
Nedostatečné pokrytí lepidlem. Mezery mezi panelem a podkladem způsobují duté místa, která se mohou prasknout při nárazu. Použijte zubatou hladítku nebo aplikujte lepidlo v pravidelných intervalech ve formě kapek.
-
Předčasné dokončení spoje. Lepidlo pro spoje musí úplně ztvrdnout před broušením. Předčasné broušení vytvoří viditelnou čáru spoje.
-
Příliš silné utahování svorek. Svorky pro spoje by měly vyvíjet rovnoměrný tlak, nikoli maximální sílu. Příliš silné utahování vytláčí příliš mnoho lepidla, čímž vznikne nedostatečně naplněný spoj.
Často kladené otázky
Otázka: Lze pevné povrchové sprchové stěny instalovat přímo na stávající dlažbu? Odpověď: Ano, za předpokladu, že je dlažba pevně přilepena a povrch je vhodně připraven. Důkladně vyčistěte, poleptejte roztokem kyseliny chlorovodíkové (nebo mechanickým drhnutím), důkladně opláchněte a naneste základní nátěr. Základní nátěr zajistí, že lepidlo pro panely adhezivně spojí s povrchem dlažby.
Otázka: Jaké jsou požadavky na údržbu sprchových stěn z pevného povrchu? Odpověď: Minimální. Po každé sprše otřete stěny stěrkou nebo ručníkem, abyste zabránili vzniku vodních skvrn (stejně jako u jakéhokoli jiného sprchového povrchu). Jednou týdně čistěte neabrazivním čisticím prostředkem. Není nutné těsnit spáry ani vyměňovat silikonové tmely.
Otázka: Jsou sprchové stěny z pevného povrchu kluzné? Odpověď: Samotný pevný povrch má koeficient tření podobný dlažbici. Pro sprchové podlahy doporučujeme povrch s texturou nebo samostatnou sprchovou vanu se protiskluzovým povrchem. Stěny z pevného povrchu nejsou z hlediska klouzání problematické.
Otázka: Doporučuje společnost Wiselink konkrétní instalatérské firmy? Odpověď: Společnost Guangdong Wiselink Ltd. spolupracuje s partnery-specialisty na zpracování pevného povrchu, kteří mají zkušenosti s instalací tohoto materiálu. Můžeme poskytnout doporučení pro firmy v regionu vašeho projektu. Instalaci vždy musí provádět specializovaný zpracovatel pevného povrchu, nikoli obecný dlažbař.
Související články

 EN
EN