সলিড সারফেস শাওয়ার ওয়াল প্যানেল: বাণিজ্যিক প্রকল্পের জন্য ইনস্টলেশন গাইড
নারাত্মক সারাংশ (সংক্ষিপ্ত)
ঘন পৃষ্ঠের শাওয়ার দেয়াল প্যানেলগুলি টাইল বা অ্যাক্রিলিক শাওয়ার আবরণ থেকে ভিন্নভাবে ইনস্টল করা হয়। প্রধান পার্থক্যগুলি হলো: প্যানেলগুলি রাসায়নিকভাবে সিম-ওয়েল্ডেড করা হয় (গ্রাউট করা হয় না), কোণগুলি তাপ-গঠিত করে চলমান কাভগুলিতে রূপান্তরিত করা যায় (কোনো কলক লাইন থাকে না) এবং সম্পূর্ণ ইনস্টলেশনটি দ্রুত—প্রতিটি বাথরুমে ২–৩ দিন সময় লাগে, যেখানে টাইলের ক্ষেত্রে ৪–৬ দিন লাগে। এই গাইডটি বাণিজ্যিক প্রকল্পের জন্য সম্পূর্ণ ইনস্টলেশন ধারাবাহিকতা কভার করে, সাবস্ট্রেট প্রস্তুতি থেকে চূড়ান্ত ফিনিশিং পর্যন্ত।
ইনস্টলেশন ধারাবাহিকতা (৭ ধাপ)
ধাপ ১: সাবস্ট্রেট প্রস্তুতি
সাবস্ট্রেট হলো ভিত্তি। ঘন পৃষ্ঠের দেয়াল প্যানেলগুলি কঠিন—এগুলি অসম দেয়ালগুলিকে ঢেকে দেওয়ার জন্য বাঁকবে না। সাবস্ট্রেটটি সমতল, লম্বভাবে সঠিক এবং জলরোধী হতে হবে।
সুপারিশকৃত সাবস্ট্রেট: ½" বা ⅝" সিমেন্ট বোর্ড (ডুরক, হার্ডিব্যাকার বা সমতুল্য) ১৬" OC-এ স্টাডের উপরে।
বিকল্পগুলি:
- জলরোধী জিপসাম বোর্ড (ডেন্সশিল্ড, মোল্ড টাফ) — যদি সঠিকভাবে সিল করা হয় তবে গ্রহণযোগ্য
- বিদ্যমান টাইল — যদি ভালোভাবে আটকানো থাকে তবে এর উপরে ইনস্টল করা যেতে পারে, কিন্তু পৃষ্ঠের প্রস্তুতি প্রয়োজন (পরিষ্কার করুন, এটচ করুন, প্রাইম করুন)
প্রধান প্রয়োজনীয়তা:
- সাবস্ট্রেটের সমস্ত জয়েন্ট টিনসেট অথবা জলরোধী মেমব্রেন দিয়ে টেপ করে সিল করতে হবে
- সাবস্ট্রেটের পৃষ্ঠটি ৪৮ ইঞ্চির মধ্যে ১/৮ ইঞ্চির মধ্যে সমতল হতে হবে
- জলরোধী স্তরটি শাওয়ারহেডের উচ্চতার চেয়ে কমপক্ষে ৬ ইঞ্চি উপরে পর্যন্ত বিস্তৃত হতে হবে
- বাহ্যিক দেয়ালে সিমেন্ট বোর্ডের পিছনে একটি বাষ্প বাধা (৬ মিল পলি) ইনস্টল করা উচিত
ধাপ ২: প্যানেল লেআউট এবং কাটিং
আঠালো প্রয়োগ করার আগে, প্যানেলগুলি শুকনো ফিটের জন্য লেআউট করা হয়।
লেআউটের বিবেচ্য বিষয়গুলি:
- উল্লম্ব সিমগুলি পছন্দনীয় (অনুভূমিক সিমের তুলনায় কম দৃশ্যমান)
- সিম স্থাপনের সময় শাওয়ারহেড থেকে সরাসরি জলের স্রোত এড়াতে হবে
- প্যানেলগুলি কোণে ⅛" ফাঁক রেখে স্থাপন করতে হবে (প্রসারণ এবং সিম আঠার জন্য)
- প্যানেলগুলি শাওয়ার ফ্লোর বা শাওয়ার বেসের উপরে ⅛" উঁচুতে থামাতে হবে
কাটা: সলিড সারফেস প্যানেলগুলি স্ট্যান্ডার্ড কার্বাইড-টিপড টুল দিয়ে কাটতে হবে:
- সোজা কাটার জন্য কার্বাইড ব্লেডযুক্ত সার্কুলার স ও (সূক্ষ্ম-দাঁতযুক্ত, ৮০+ দাঁত)
- কাটআউটের জন্য কার্বাইড ব্লেডযুক্ত জিগস ও (শাওয়ার ভালভ, শাওয়ারহেড, নিচ)
- সঠিক প্রান্ত সমাপ্তির জন্য ফ্লাশ-ট্রিম বিটযুক্ত রাউটার
ধাপ ৩: আঠা প্রয়োগ
প্যানেলগুলি দুই-অংশবিশিষ্ট এপক্সি আঠা বা প্যানেল-বিশেষ সলিড সারফেস আঠা ব্যবহার করে সাবস্ট্রেটের সঙ্গে আঠাযুক্ত করা হয়।
প্রয়োগের পদ্ধতি:
- আঠা উল্লম্বভাবে ৬" অন্তর সাবস্ট্রেটে প্রয়োগ করুন
- সমস্ত প্রান্ত বরাবর একটি অবিচ্ছিন্ন বিন্দু প্রয়োগ করুন
- প্যানেলটি স্থানে স্থাপন করুন এবং একটি রাবার ম্যালেট দিয়ে টোকা দিন যাতে সম্পূর্ণ যোগাযোগ নিশ্চিত হয়
- সমস্ত সংলগ্ন প্যানেলের প্রান্ত ও কোণে ⅛" ফাঁক বজায় রাখতে প্যানেল স্পেসার বা শিম ব্যবহার করুন
ধাপ ৪: সিম ওয়েল্ডিং (গুরুত্বপূর্ণ ধাপ)
এটিই ভালো ইনস্টলেশন এবং খারাপ ইনস্টলেশনের মধ্যে পার্থক্য নির্ধারণ করে। সিম ওয়েল্ডিং সংলগ্ন প্যানেলগুলির মধ্যে অদৃশ্য যোগস্থল তৈরি করে।
প্রক্রিয়া:
- আঠা শক্ত হওয়ার পর (২৪ ঘণ্টা), ডেনাচার্ড অ্যালকোহল দিয়ে সিম ফাঁকটি পরিষ্কার করুন
- সিম ফাঁকে সিম আঠা (পিএমএমএ-ভিত্তিক) সিরিঞ্জ বা অ্যাপ্লিকেটর বোতল ব্যবহার করে প্রয়োগ করুন
- সিম ক্ল্যাম্প টুল দিয়ে ৪৫–৬০ মিনিটের জন্য সিমটি ক্ল্যাম্প করুন
- আঠা শক্ত হওয়ার পর, একটি ধারালো স্ক্র্যাপার দিয়ে অতিরিক্ত আঠা সমতল করে কেটে ফেলুন
- সিম অঞ্চলটি ক্রমান্বয়ে স্যান্ড করুন (১২০ → ২৪০ → ৪০০ → ৬০০ গ্রিট)
- ম্যাট ফিনিশ পুনরুদ্ধারের জন্য চূড়ান্ত বাফিং
দক্ষ ফ্যাব্রিকেটর একটি সিমকে "অদৃশ্য" করে তুলতে পারেন — ওয়েল্ডেড জয়েন্টটি মূল উপাদানের মতোই শক্তিশালী হয়ে ওঠে এবং ১২ ইঞ্চি দূর থেকে দৃশ্যমান হয় না।
ধাপ ৫: কোণ চিকিৎসা
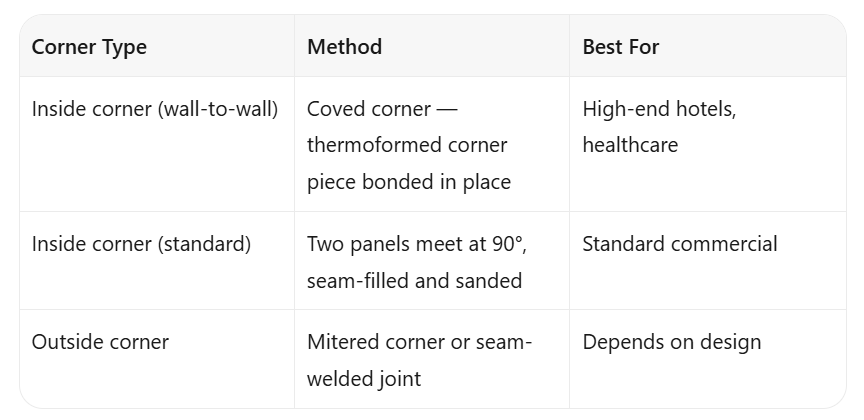
হোটেলের শাওয়ার রুমের জন্য কভড কোণগুলি পছন্দনীয় স্পেসিফিকেশন। থার্মোফর্মড কভ টুকরোটি দেয়াল সংযোগস্থলে একটি অবিচ্ছিন্ন বক্ররেখা তৈরি করে — কোনো কলক লাইন নেই, কোনো ময়লা জমে না, পরিষ্কার করা সহজ।
ধাপ ৬: ফিক্সচারের জন্য কাটআউট
প্যানেলগুলি ইনস্টল করার পরে শাওয়ার ভাল্ভ, শাওয়ারহেড এবং নিচ কাটআউটগুলি করা হয়:
- টেমপ্লেট বা পরিমাপ ব্যবহার করে ফিক্সচারের অবস্থান চিহ্নিত করুন
- গোলাকার কাটআউটের জন্য হোল স ব্যবহার করুন (কার্বাইড-টিপড)
- পরিষ্কার ফিনিশের জন্য কাটআউটের প্রান্ত রাউটার করুন
- ফিক্সচার এসকুচিয়ন প্লেটের চারপাশে সিলিকন সিল্যান্ট প্রয়োগ করুন (এটি অনেকগুলি কলক লাইনের মধ্যে একটি যা এড়ানো সম্ভব নয় — কিন্তু এটি ট্রিম প্লেটের পিছনে থাকে, দৃশ্যমান নয়)
গভীর নিচের জন্য (সাবান/শ্যাম্পু শেল্ফ): নিচটি প্যানেলে কাটা যেতে পারে এবং এটি একটি কঠিন পৃষ্ঠ বা জলরোধী পৃষ্ঠের সাথে সমর্থিত হতে পারে। সম্ভব হলে নিচের কোণগুলো গোলাকার করুন।
ধাপ ৭: চূড়ান্ত সমাপন
- সমস্ত সিম এবং কাটআউট অঞ্চলকে চূড়ান্ত গ্রিট (৬০০) এ খসড়া দিন
- প্রয়োজন হলে ম্যাট ফিনিশ রিস্টোরার প্রয়োগ করুন
- ডিনেচার্ড অ্যালকোহল দিয়ে সমগ্র পৃষ্ঠটি পরিষ্কার করুন
- শাওয়ার বেস এবং প্যানেলের যোগস্থলে সিলিকন সিল্যান্ট প্রয়োগ করুন (১/৮" বিয়াড, মসৃণ করে টুল করা)
- এসকুচন প্লেট এবং ট্রিম ইনস্টল করুন
ইনস্টলেশন সময়সূচী (প্রতি বাথরুমে)
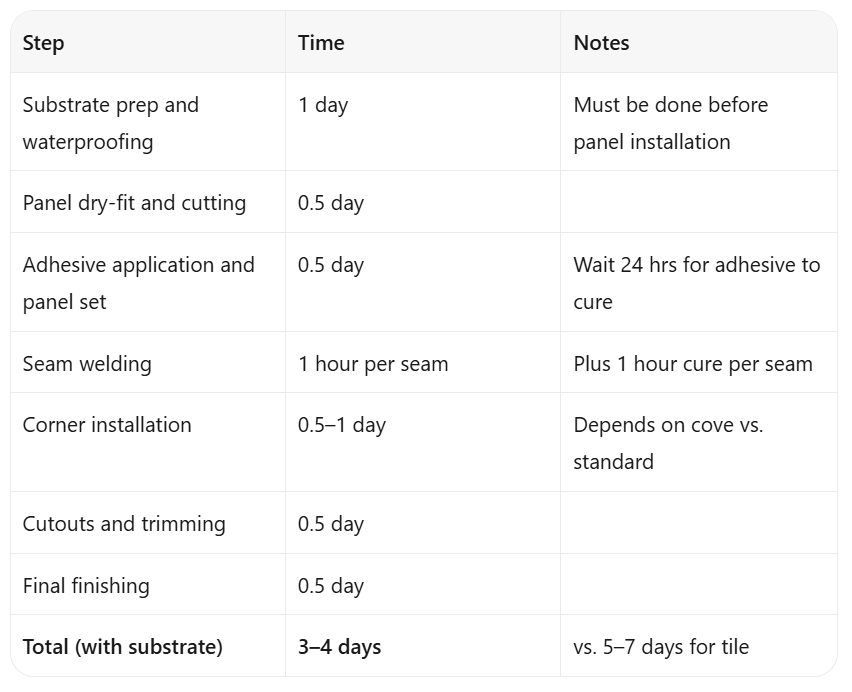
যেসব ঘর সেবার বাইরে রয়েছে এমন রিনোভেশন প্রকল্পের ক্ষেত্রে টাইলের তুলনায় সময় সাশ্রয় উল্লেখযোগ্য হতে পারে। প্রতি ঘরে ২ দিন সাশ্রয় করে ২০০ ঘরের হোটেলে ৪০০ দিনের নির্মাণ সময় পুনরুদ্ধার করা যায়।
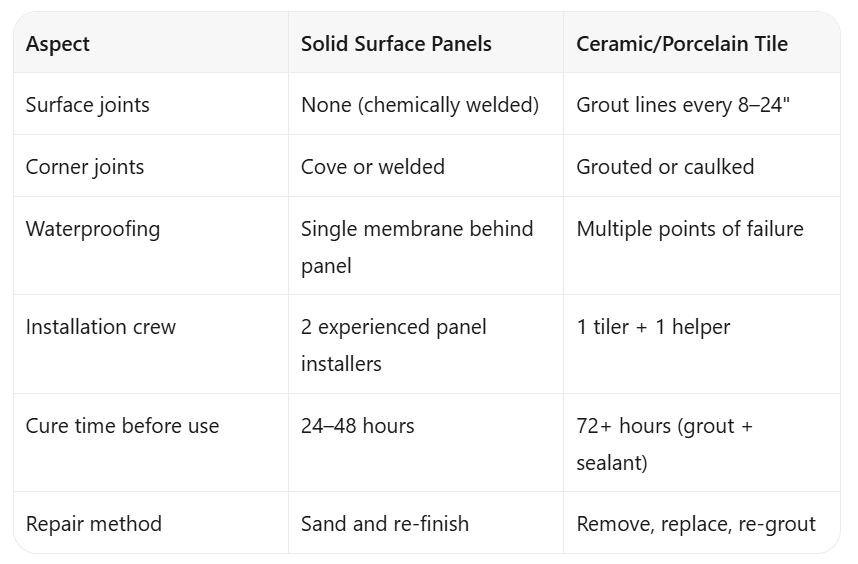
টাইল ইনস্টলেশন থেকে প্রধান পার্থক্য
সাধারণ ইনস্টলেশন ভুলগুলি
-
অসমতল সাবস্ট্রেট। কঠিন পৃষ্ঠতল নমনীয় নয়। দেয়ালে ¼" গভীরতা হলে এটি দৃশ্যমান ফাঁক হয়ে ওঠে। প্যানেল ইনস্টল করার আগে দেয়ালটি ঠিক করুন।
-
আঠালো পদার্থের অপর্যাপ্ত আবরণ। প্যানেল এবং সাবস্ট্রেটের মধ্যে ফাঁক হলে খালি জায়গা তৈরি হয়, যা আঘাতের ফলে ফেটে যেতে পারে। ধ্রুব দূরত্বে নট ট্রোয়েল বা আঠালো পদার্থের বিন্দু ব্যবহার করুন।
-
জয়েন্টের শক্ত হওয়ার সময় তাড়াহুড়ো করা। জয়েন্টের আঠালো পদার্থকে স্যান্ডিং করার আগে সম্পূর্ণ শক্ত হতে হবে। সময়ের আগে স্যান্ডিং করলে দৃশ্যমান জয়েন্ট লাইন তৈরি হয়।
-
ক্ল্যাম্প অত্যধিক টানা। জয়েন্টের ক্ল্যাম্পগুলি সমান চাপ প্রয়োগ করবে, সর্বোচ্চ শক্তি নয়। অত্যধিক টানলে আঠালো পদার্থ অতিরিক্ত বেরিয়ে আসে, ফলে জয়েন্টটি দুর্বল হয়ে যায়।
প্রশ্নোত্তর
প্রশ্ন: কি কঠিন পৃষ্ঠের শাওয়ার দেয়ালগুলি বিদ্যমান টাইলের উপর ইনস্টল করা যায়? উত্তর: হ্যাঁ, যদি টাইলগুলি ভালোভাবে আঠালো হয়ে থাকে এবং পৃষ্ঠতলটি প্রস্তুত করা হয়। ভালোভাবে পরিষ্কার করুন, মিউরিয়াটিক অ্যাসিড দ্রবণ (বা যান্ত্রিক ঘষন) দিয়ে এটিকে এটচ করুন, ধুয়ে ফেলুন এবং প্রাইমার প্রয়োগ করুন। প্রাইমারটি নিশ্চিত করে যে প্যানেলের আঠালো পদার্থ টাইলের পৃষ্ঠে আঠালো হয়ে যাবে।
প্রশ্ন: সলিড সারফেস শাওয়ার ওয়ালের জন্য রক্ষণাবেক্ষণের প্রয়োজনীয়তা কী? উত্তর: ন্যূনতম। প্রতিটি শাওয়ারের পর একটি স্কুইজি বা তৌলিয়া দিয়ে পানির দাগ রোধ করতে মুছে ফেলুন (যেকোনো শাওয়ার সারফেসের মতোই)। সপ্তাহে একবার অ-অ্যাব্রেসিভ ক্লিনার দিয়ে পরিষ্কার করুন। গ্রাউট সিলিং বা কল্ক প্রতিস্থাপনের প্রয়োজন নেই।
প্রশ্ন: সলিড সারফেস শাওয়ার ওয়ালগুলি পিছলে যায় কি? উত্তর: সলিড সারফেসের ঘর্ষণ সহগ টাইলের মতোই। শাওয়ার ফ্লোরের জন্য টেক্সচার্ড সারফেস নির্দিষ্ট করুন অথবা স্লিপ-রেজিস্ট্যান্ট ফিনিশ সহ আলাদা শাওয়ার বেস ব্যবহার করুন। সলিড সারফেস ওয়ালগুলি পিছলে যাওয়ার কোনো ঝুঁকি নয়।
প্রশ্ন: উইজেলিঙ্ক নির্দিষ্ট ইনস্টলেশন ঠিকাদারদের সুপারিশ করেন কি? উত্তর: গুয়াংডং উইজেলিঙ্ক লিমিটেড সলিড সারফেস ইনস্টলেশনে অভিজ্ঞ ফ্যাব্রিকেটর পার্টনারদের সাথে কাজ করে। আমরা আপনার প্রকল্পের অঞ্চলে রেফারেন্স প্রদান করতে পারি। ইনস্টলেশনটি সর্বদা একজন সলিড সারফেস ফ্যাব্রিকেটর দ্বারা সম্পন্ন করা উচিত, সাধারণ টাইল ঠিকাদার দ্বারা নয়।
সংশ্লিষ্ট নিবন্ধ

 EN
EN